Master Photo Editing for E-Commerce Success

In e-commerce, photo editing isn't just about making pictures look nice. It's the essential process of refining your product images to meet the strict standards of online marketplaces and, more importantly, to drive sales. This means correcting colors, cleaning up backgrounds, and sharpening details to create a consistent, professional look that earns a shopper's trust and gets them to click "buy."
Think of it as a crucial business function, not just a final touch-up.
Why Great Images Are Your Silent Salesperson
In the world of online retail, your product photos are doing some heavy lifting. They’re your digital handshake, your first impression, and a promise of quality all rolled into one. High-quality visuals are everything because they close the gap between a customer seeing a product on a screen and holding it in their hands.
Put yourself in the customer's shoes. They can't touch the fabric, feel the weight, or see the craftsmanship up close. Your images are the only tool they have to make a judgment call. When those images are sharp, clear, and accurately represent the product, you’re building trust without saying a word.
Bridging The Physical To Digital Gap
The biggest challenge in e-commerce is turning a tangible item into a compelling digital experience. This is where professional photo editing for e-commerce shifts from a simple task to a core business strategy. It’s not about misrepresenting a product; it’s about making sure the digital version is as clear and dependable as the real thing.
Imagine a shopper looking at a handbag online. An unedited, straight-from-the-camera photo might have serious problems:
- Inaccurate Colors: Bad lighting could make a navy blue bag look black, setting you up for an inevitable and costly return.
- Distracting Backgrounds: A cluttered background cheapens the product's perceived value and screams "amateur."
- Minor Flaws: A single stray thread or a speck of dust can make a brand-new item look used or poorly made.
Good editing fixes all of this, ensuring the product is presented perfectly every time. This consistency across your entire catalog creates a cohesive brand image that shoppers learn to rely on.
This infographic breaks down how moving from raw, unedited photos to professionally edited ones can directly lift your most important business metrics.
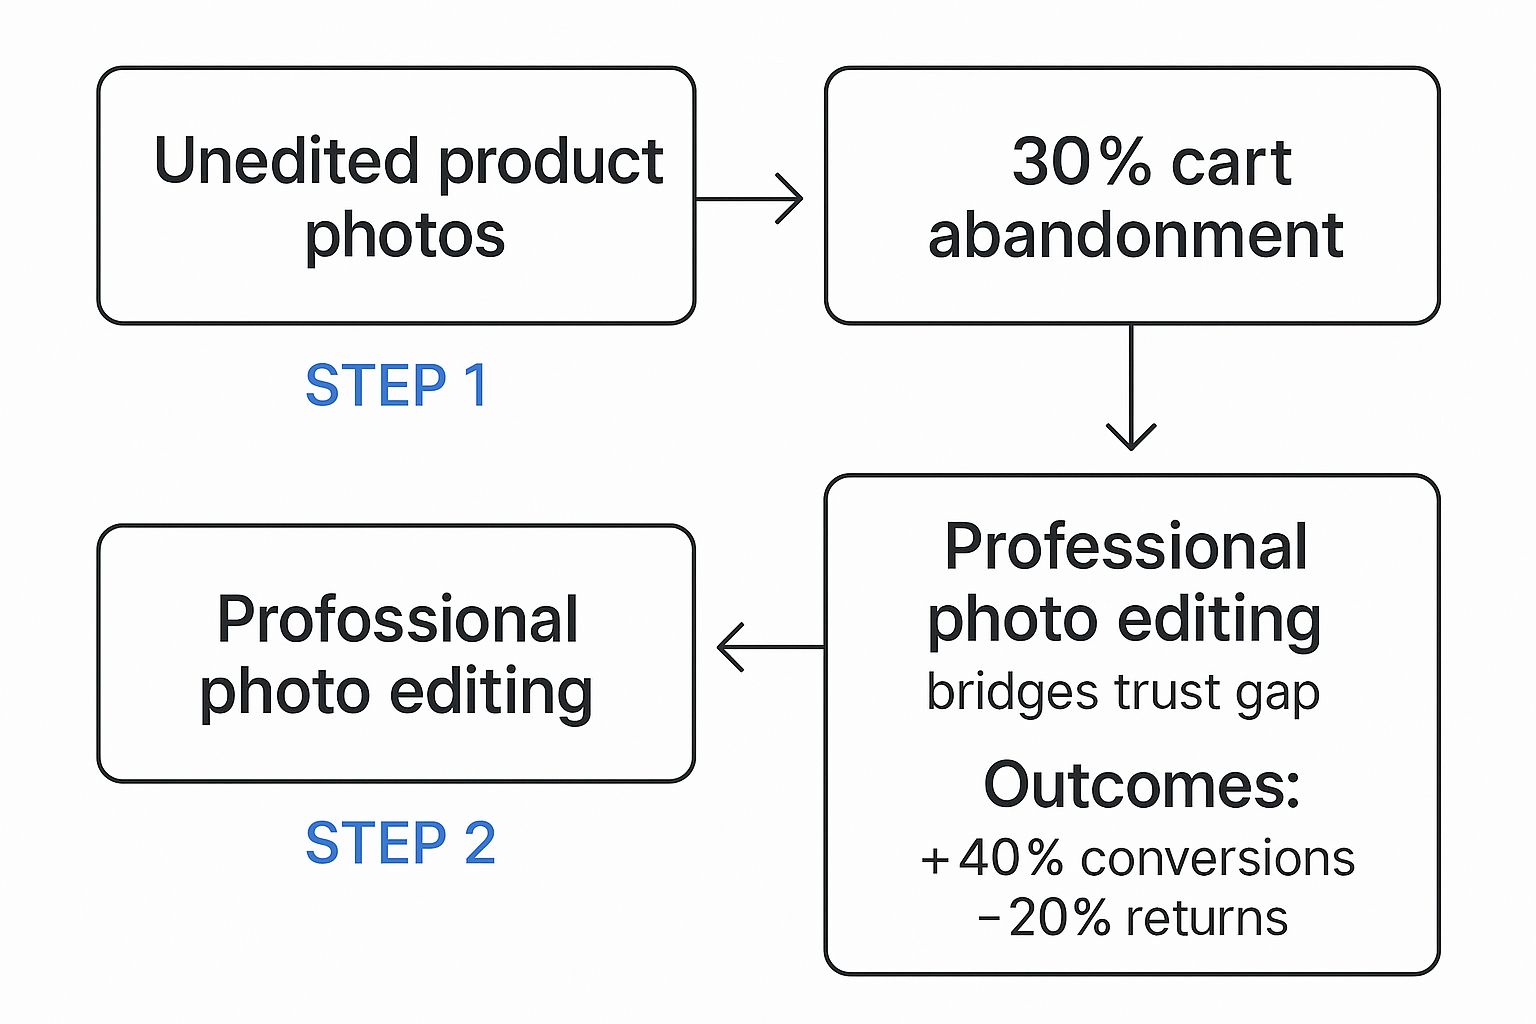
As you can see, investing in proper editing is a direct path to reducing cart abandonment, boosting conversions, and cutting down on those painful returns.
The True Cost of Poor Visuals
Inconsistent or low-quality photos do more than just fail to make a sale—they actively damage your brand's reputation. Shoppers immediately associate poor visuals with untrustworthy sellers, often causing them to abandon their carts and never look back. Every blurry photo or off-color image sends a quiet signal that you might not be a professional or reliable business.
Quality photo editing directly tackles customer uncertainty. By presenting products with clarity and accuracy, you reduce the perceived risk of buying online, which is one of the biggest hurdles to overcome.
Of course, the best editing results start with a great source image. The principles of good lighting and composition are universal, whether you're shooting a t-shirt or a gourmet meal. A good guide to food photography and lighting for restaurants, for instance, contains lessons on lighting that apply to almost any product. When you start with a better photo, the editing process is faster and the final result is far more impactful.
How Editing Actions Translate to Business Results
It's helpful to connect specific editing tasks to tangible business outcomes. This isn't just about aesthetics; every action has a purpose tied to your bottom line.
| Editing Action | Business Impact | Example Metric Affected |
|---|---|---|
| Background Removal | Creates a clean, consistent look that meets marketplace standards (e.g., Amazon, eBay) and focuses customer attention solely on the product. | Bounce Rate |
| Color Correction | Ensures the product color is accurate, which reduces returns from customers who received an item that didn't match the photo. | Return Rate |
| Retouching & Flaw Removal | Presents the product in its best possible condition, enhancing its perceived value and building trust in the brand's quality. | Conversion Rate |
| Shadow Creation | Adds depth and realism, making the product look more tangible and professional, which can increase a customer's confidence to buy. | Add-to-Cart Rate |
These edits work together to build a professional, trustworthy storefront that encourages shoppers to complete their purchase.
Ultimately, great images are working for you 24/7. They don’t just display products; they build credibility, manage customer expectations, and quietly persuade shoppers that your brand is the right choice. The numbers back this up: about 60% of online shoppers say high-quality photos are the most important factor in their buying decision.
Investing in quality photo editing is an investment in your brand’s reputation and your revenue. It's a foundational piece of any strategy for improving ecommerce conversion rates and building a customer base that keeps coming back.
Building a Repeatable Editing Workflow
In e-commerce, consistency isn't just a nice-to-have; it's everything. When a potential customer clicks through your products, a cohesive, professional look tells them your brand is trustworthy and high-quality. The secret to this isn't just editing one photo well—it's building a system to make every photo look great with minimal fuss.
Think of a solid workflow as your quality control. It takes a creative, sometimes messy, process and turns it into a set of reliable steps. This lets you produce fantastic results quickly, whether you're a one-person shop or a team launching hundreds of products. It’s the key to scaling your business without letting your visual standards slip.
The right software is the heart of any good workflow. For most professionals, that means Adobe Photoshop. Its power lies in layer-based editing, giving you granular control over every pixel.
As you can see, the interface is packed with tools that let you do everything from flawlessly removing backgrounds to making the tiniest of touch-ups.
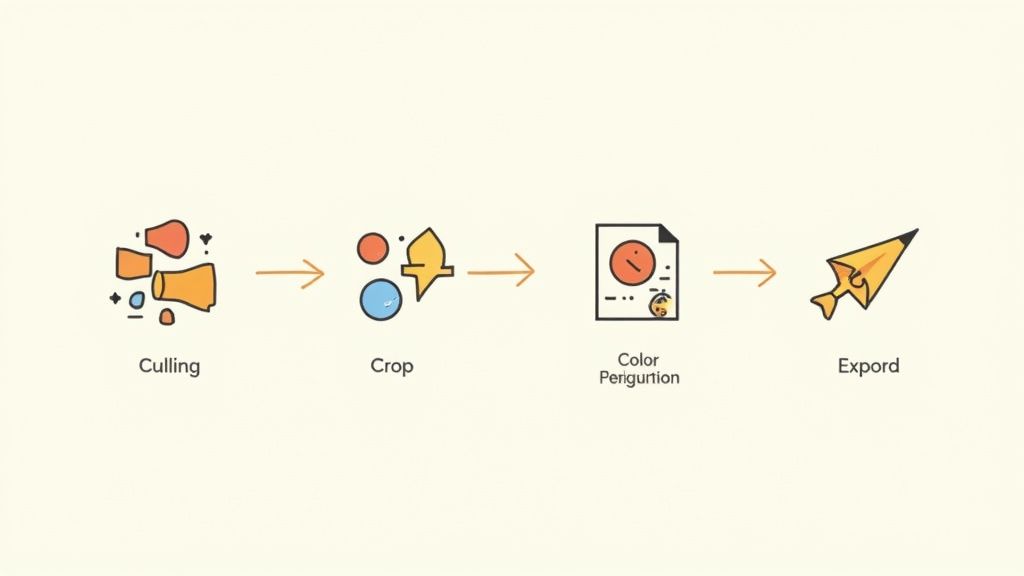
Culling and Organizing Your Initial Shots
Before you even dream of making a single adjustment, you need to get organized. After any photoshoot, you’ll have way more photos than you need. Some will be out of focus, others will have weird lighting, and you'll probably have a dozen near-identical shots. The first job is to filter the good from the bad—a process we call culling.
The goal here is to be ruthless. Quickly ditch the unusable shots and pick only the strongest contenders for editing. This simple act saves you from wasting hours trying to rescue a photo that was never going to work.
Once you have your keepers, a basic folder system will save you headaches down the road. I stick to a simple structure that always works:
- RAW/Originals: This is where every unedited file from your camera lives, untouched.
- Selects: The best-of-the-best photos you picked during the culling process.
- Edited/Final: Your finished, web-ready images go here.
It’s not complicated, but this basic housekeeping makes it easy to find exactly what you need, when you need it.
Foundational Edits for Every Product Photo
With your best images selected and sorted, it’s time to start the real work. These next few edits are the foundation of your entire product gallery, and you should apply them consistently to create a uniform brand look.
This is where you'll fall in love with batch processing. It’s a feature in most editing software that lets you apply the same adjustments—like a specific brightness level or color profile—to a whole group of photos at once. When you’ve shot dozens of products under the same lights, this technique is an absolute game-changer. It can literally save you hours of mind-numbing, repetitive work.
Here are the core edits I apply to almost every product photo:
- Cropping and Straightening: Every product needs to be framed consistently. Most platforms, like Shopify or Amazon, favor a square 1:1 aspect ratio. I always make sure to straighten any slightly tilted products or horizons for a clean, professional feel.
- Exposure and Contrast Adjustments: Your products need to be bright, clear, and easy to see. Bumping up the exposure brightens the whole image, while a little contrast adjustment adds that "pop" that makes the details stand out.
- White Balance Correction: This is probably the single most critical step in photo editing for e-commerce. Correcting the white balance ensures that white objects in your photo are truly white. Get this right, and all the other colors in your image will be accurate. Get it wrong, and that white t-shirt might look blue or yellow, leading to confused customers and costly returns.
A consistent white balance across all your product photos is non-negotiable. It’s what ensures your "cherry red" lipstick looks like the same cherry red on every single listing, building essential trust with your buyers.
Creating and Using Presets for Brand Consistency
Once you’ve dialed in the perfect edits for one image, don't do it all over again for the next one. Instead, save those settings as a preset. A preset is basically a saved recipe of adjustments that you can apply to other photos with a single click.
Think of presets as your brand's unique visual signature. I recommend creating a few different ones for various scenarios—one for studio shots on a white background, another for lifestyle photos in natural light. This is a remarkably powerful way to maintain a specific aesthetic and lock in your brand’s identity.
From there, the process is simple and efficient. For each new batch of photos, you just apply your base preset and then make small, individual tweaks as needed. It transforms your workflow from a blank canvas every time to a streamlined system. The only thing left is to export the files in the right format and size, perfectly optimized to load fast on your website without losing an ounce of quality.
Advanced Edits That Justify a Higher Price
Once your basic workflow is down to a science, you can start exploring the techniques that truly make your product photos stand out. This is where we move beyond simple corrections and start using editing to build a premium brand perception. These advanced edits are what separate a standard product listing from the kind of high-end imagery that commands a higher price.
It's all about the details that subconsciously tell a shopper, "this is a quality product." They might not consciously register the perfectly rendered shadow on a handbag, but they'll feel that the product looks more professional and tangible. Think of mastering these skills as a direct investment in your brand's perceived value.
Adding Depth with Realistic Shadow Creation
Ever notice how products on a stark white background can sometimes look like they’re just floating in space? That flatness makes them feel less real, and frankly, less desirable. The fix is to add a subtle, realistic shadow that grounds the product, giving it dimension and a sense of place.
I generally work with a few different types of shadows, depending on the product and the vibe we're going for:
- Natural Shadow: This is where we keep and refine the original shadow from the photoshoot. It’s my go-to for creating a feeling of authenticity, as if the product is sitting right there on a real surface.
- Drop Shadow: A more graphic approach, a drop shadow is a soft, gray shadow added just behind the product. It gives the item a slight lift off the background, making it pop.
- Reflection Shadow: For anything with a glossy surface—like sunglasses, electronics, or jewelry—adding a faint reflection creates that premium, showroom-floor look.
No matter which you choose, the key is always subtlety. A shadow that’s too dark or has a hard edge just screams "fake." The goal is to create just enough depth to make the product feel like something you can reach out and touch.
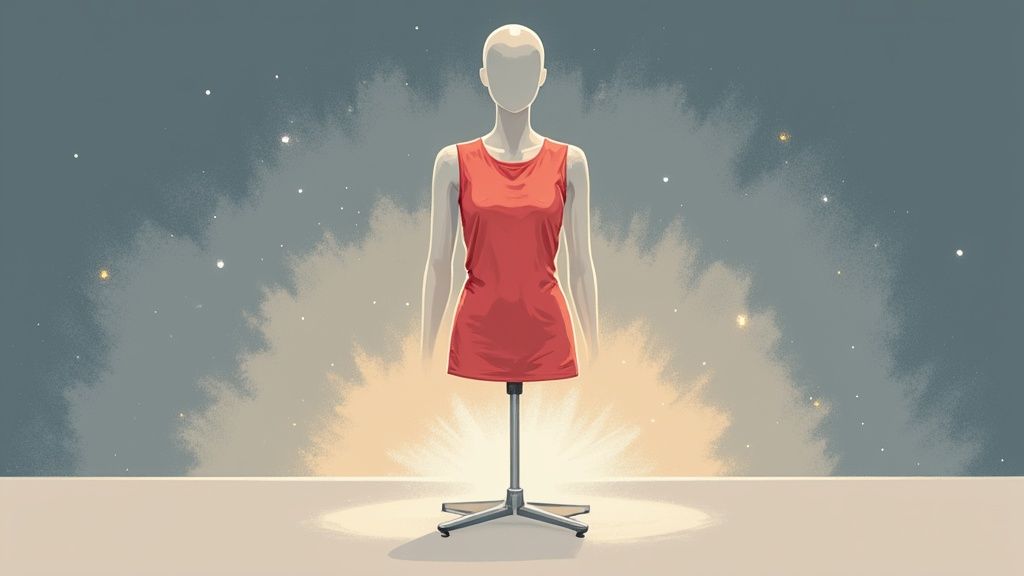
The Ghost Mannequin Effect for Apparel
If you sell clothing online, you know the struggle: how do you show the fit of a garment without a distracting model or a clunky mannequin? This is where the ghost mannequin (or invisible mannequin) effect is a game-changer. It’s a clever compositing technique where we stitch together multiple shots—usually one on the mannequin and another of the interior details, like the collar.
The final image shows the garment with its true shape and form, almost as if an invisible person is wearing it. This is incredibly powerful for shoppers. It helps them visualize the fit and drape of the clothing in a clean, focused way, answering crucial questions like "How does that collar sit?" or "What's the cut of the waist?" without any distractions.
Precision Retouching for a Flawless Finish
Even in the most controlled photoshoot, tiny imperfections can sneak in. A speck of dust, a stray thread, a fingerprint—these little distractions can subtly undermine the perceived quality of your product. Precision retouching is the meticulous art of eliminating these flaws without leaving a single trace of the edit.
This isn't just about brightness and contrast. It's about getting in there and handling the small stuff:
- Dust and Scratches: Carefully removing tiny specks from a piece of tech or a small scuff on a leather bag.
- Fingerprints and Smudges: Cleaning up glossy or reflective surfaces so they look pristine.
- Manufacturing Flaws: Fixing a loose thread on a shirt or a minor blemish from the factory floor.
The goal of retouching isn't to change the product, but to present it in its most perfect, idealized form. It’s about removing temporary imperfections so the true quality of the item can shine through.
This level of polish isn't just a nice-to-have; it's standard practice for the biggest names in the business. High-quality product images are a core driver of e-commerce success. A survey of over 150 top fashion brands confirmed that professional photo editing is simply non-negotiable. From high-end brands like Ralph Lauren to sportswear giants like Nike and major retailers like Gap, everyone depends on these flawless visuals to maintain their premium status. You can see more on how the top brands do it by checking out these fashion photography insights.
Ultimately, these advanced techniques justify the extra time and cost by building a powerful brand image. When every photo is perfect, it sends a clear message to your customers: this is a brand that cares about quality, right down to the last detail. That kind of perception is priceless.
Optimizing Images for Speed and SEO
Once you’ve perfected the look of your product photos, it’s tempting to call it a day. But hold on—the most beautiful image in the world can actually hurt your sales if it’s not technically optimized. A massive, high-resolution photo might look stunning, but if it slows down your site, impatient shoppers will leave before it even finishes loading. This is where the technical side of photo editing for e-commerce becomes a game-changer.
The final step is all about finding that perfect balance between visual quality and site performance. You need crisp, clear images that load in a flash. We’ve all been there—staring at a blank screen, waiting. Slow pages are notorious conversion killers. In fact, just a one-second delay in page load time can lead to a significant drop in sales. That’s how high the stakes are.

The Art of Image Compression
Image compression is just a fancy way of saying "making the file size smaller." When you do it right, the quality drop is so minimal you can't even see it, but the difference in your site’s loading speed is huge. The trick is to use either lossless or very light lossy compression.
- Lossless Compression: This method shrinks the file size without throwing away any of the original image data. It’s perfect for maintaining maximum quality, but the file size reduction won't be as dramatic.
- Lossy Compression: This one is a bit more aggressive. It intelligently removes some data to make the file much smaller. A little bit is usually fine for the web, but if you go too far, your images will start looking blocky and pixelated.
Most editing software has a "Save for Web" function that’s incredibly useful. It lets you see a live preview of the image quality as you adjust the compression slider. I always suggest playing with it to find that sweet spot where the file size is low, but the image still looks sharp. If you need a quick fix, a dedicated https://quickpixel.co/tools/image-compressor can handle this for you in seconds.
Choosing the Right File Format
The file format you save your image as—like JPEG or PNG—has a massive impact on both its size and quality. There isn't one "best" format for everything; it really depends on the type of image you're working with.
I've put together this quick comparison to help you choose the right format for the job. Think of it as your cheat sheet for optimizing every kind of product photo.
Choosing the Right Image Format
| File Format | Best Use Case | Key Feature | Main Consideration |
|---|---|---|---|
| JPEG | Standard product photos with many colors and gradients, like apparel or lifestyle shots. | Offers excellent compression for complex images, resulting in small file sizes. | Does not support transparency, so it's not suitable for images on non-white backgrounds. |
| PNG | Images requiring a transparent background, such as logos or product shots on colored pages. | Supports lossless compression and full transparency, preserving sharp edges. | File sizes can be significantly larger than JPEGs, especially for complex photos. |
| WebP | A modern format for all image types, designed to replace JPEG and PNG. | Provides superior compression (both lossy and lossless) and supports transparency, at much smaller file sizes. | While browser support is now excellent, some very old systems may not display it. |
For most online stores, using JPEGs for your standard photos and PNGs for anything that needs a transparent background is a solid, reliable strategy. If you want to get ahead of the curve, start introducing WebP formats to give your site a serious speed advantage.
Image SEO Practices That Get You Found
Search engines like Google can't actually see your images. They rely on the text you provide to understand what the image is about and show it to people searching for your products. This is a part of SEO that’s so often missed, but it can drive a ton of valuable traffic to your store.
Think of image SEO as making your photos legible to Google. By using descriptive file names and alt text, you’re giving search engines the context they need to show your products to interested buyers.
First things first, always rename your image files before you upload them. A file named IMG_8472.jpg is meaningless to a search engine. Something like blue-wool-turtleneck-sweater.jpg is a thousand times better. It’s clear, includes keywords, and helps with your own file management.
Next up is alt text (alternative text). This is a short, simple description of the image. It's what shows up if the image breaks, and it's what screen readers use to describe the image to visually impaired users. Good alt text is descriptive: "A woman wearing a blue wool turtleneck sweater in a cozy living room."
By optimizing your images for both speed and search, you ensure they’re not just sitting there looking pretty—they’re actively working to attract and convert customers. And if you're selling across multiple platforms, checking out a Social Media Post Dimensions Guide will help make sure your visuals look great everywhere.
Finding the Right Editing Tools for Your Business
Choosing the right tool for your e-commerce photo editing really comes down to your business's specific needs, your product volume, and what you're willing to spend. It’s easy to get lost in all the options out there, but they generally fall into a few main buckets. The real goal is to find what gives you the best bang for your buck, whether that’s measured in time, money, or both.
You’ve got everything from heavyweight, industry-standard software to super simple apps and even fully automated services. Figuring out where each one shines will help you land on a choice that actually fits how you work and the level of quality you’re aiming for.
Professional Software: The DIY Powerhouse
If you want total creative freedom and don't mind a bit of a learning curve, professional-grade software is the classic route. This approach lets you control every single pixel, which is how you get those high-end, premium-looking product shots that really stand out.
- Adobe Photoshop: There's a reason this is the undisputed king of photo editing. Its powerful, layer-based system and incredibly precise selection tools are exactly what you need for complex jobs like creating ghost mannequin effects or doing detailed retouching. It takes time to master, for sure, but the results speak for themselves.
- Affinity Photo: Think of this as the strongest contender to Photoshop, but without the monthly subscription. It packs a similar punch with professional-level tools for a one-time fee, making it a fantastic choice for anyone trying to keep ongoing costs down without giving up much power.
This path is really for businesses that either have a dedicated creative person on staff or for founders who genuinely enjoy the craft of editing. You get ultimate control, but it also demands the biggest investment of your time.
Accessible Alternatives for Speed and Simplicity
Let's be real—not everyone needs the horsepower of something like Photoshop. For a lot of sellers, especially when you're just getting started, the main goals are speed, simplicity, and getting a "good enough" result quickly. This is where more user-friendly, often browser-based, tools come into play.
The best tool isn't always the most complex one. It's the one that allows you to produce consistent, high-quality images efficiently within your current business structure.
Canva is a huge name here. While it's not strictly a photo editor, its drag-and-drop interface and ready-made templates are perfect for basic edits like cropping or adjusting brightness, and for whipping up branded marketing materials in a flash. It's built for speed and is great for social media posts, but it just doesn't have the granular control you need for serious product retouching.
The Rise of AI-Powered Editing
The newest players on the field are AI-powered editing tools, and they're growing fast. These platforms are built to automate the most tedious and repetitive parts of photo editing for e-commerce. The huge advantage here is efficiency—you can churn through massive batches of photos in a tiny fraction of the time it would take to do it all by hand.
These AI tools are especially good at tasks like:
- Automated Background Removal: Creating those clean, white backgrounds required by marketplaces almost instantly.
- Smart Retouching: Automatically spotting and zapping minor dust specks or blemishes on a product.
- AI Background Generation: Dreaming up entirely new, realistic backgrounds to match a specific marketing campaign.
The trade-off? You give up some of that fine-tuned creative control for raw speed. The results are often surprisingly good, but they may lack the artistic touch of a human editor. This makes AI tools a perfect fit for businesses with a high volume of products that need to get online as fast as possible.
Of course, for sellers who would rather just hand the whole task over to an expert, looking into a dedicated product photo editing service can be a smart move. You get professional quality without any of the hands-on work. It all just comes down to what makes the most sense for where your business is right now.
Got E-Commerce Photo Editing Questions? We've Got Answers.
Even when you have a good system down, you're bound to hit a few snags while editing product photos. It happens to everyone. Let's tackle some of the most common questions that pop up, so you can get unstuck and back to selling.
How Can I Make My Product Colors Look Right?
This is a big one. If the color is off online, you can bet you'll see an increase in returns. Getting it right starts with a simple step: correcting the white balance.
Grab the eyedropper tool in your editing software and click on an area of your photo that you know should be pure white or a neutral gray. This one click tells the software what "true white" looks like, and it will instantly adjust all the other colors in the image to be more accurate. It’s often a night-and-day difference.
For those stubborn colors that still aren't quite right, dive into the hue, saturation, and luminance (HSL) sliders. Is that red shirt looking a little too much like a tangerine? You can specifically target the red and orange channels and tweak them until they're perfect, all without messing up the other colors in the shot.
What's the Best Resolution for E-Commerce Photos?
You're looking for the sweet spot between sharp detail and fast loading times. A slow site kills conversions. For most platforms, from Shopify to Amazon, aiming for 2048 x 2048 pixels is a solid goal for your main product images. This size is big enough for customers to zoom in and see the details without creating a massive file that will drag your page speed down.
After you resize, don't forget to compress. Saving your images as JPEGs at a quality setting of around 80-90% is usually the sweet spot. It dramatically cuts down the file size but keeps the image looking crisp and professional.
Is a Pure White Background Really Necessary?
For your main product shot? Yes, it's pretty much non-negotiable. Major marketplaces like Amazon and Google Shopping demand a pure white background (RGB 255, 255, 255). It’s the industry standard for a reason—it creates a clean, uniform look across listings and puts the customer's full focus squarely on your product. No distractions.
But that's just for the primary image. For all your other photos—the lifestyle shots, in-context images, and detailed close-ups—feel free to get creative. Use backgrounds that help tell your product's story, showcase its features in a real-world setting, and inject some of your brand's personality into the listing.
Think of it this way: The white background shot is the handshake. Your other images are the conversation.
Can I Just Edit Photos on My Phone?
Look, mobile editing apps have come a long, long way. They're incredibly powerful for what they are. But for serious photo editing for e-commerce, they just don't cut it. A desktop computer with a color-calibrated monitor is essential for getting the precision you need for critical color correction and blemish removal. Your phone screen simply can't show you the true colors your customers will see.
That said, your phone is perfect for quick social media edits. Need to crop an image or bump up the brightness for an Instagram story? A good mobile app is great for that. Just don't rely on it for the hero shots that will make or break a sale on your website.
Ready to skip the learning curve and get studio-quality images from your existing photos? QuickPixel uses AI to transform your simple snapshots into professional, conversion-driving product visuals. Get your professional product photos today.
Try QuickPixel Today
Get started with our AI-powered image generation tools