How to Edit Product Photos for Higher Sales

Getting your product photos right really boils down to three stages: preparation, editing, and optimization. I can't stress this enough: the most important work happens before you even open your editing software. Nailing the prep makes everything that comes after it a whole lot easier.
Laying the Groundwork for Perfect Edits
Look, you can be a wizard in Photoshop, but even the best editing can't truly rescue a bad photo. The real secret to a stunning product shot is starting with a solid foundation. If you put in the effort up front, you'll slash your editing time and end up with images that look genuinely professional.
The whole point of the initial photoshoot is to capture clean, accurate information. This means controlling your environment to get consistent, well-lit shots that need only minor tweaks, not major surgery.
Create a Consistent Photoshoot Setup
Consistency is everything in product photography. When every photo on your site—from the lighting to the angles—feels like it belongs to the same family, it builds trust. Customers see that cohesion and it tells them you're a professional brand. A jumbled mix of backgrounds and lighting just looks amateurish and can make your whole store feel less credible.
The best way to get this right is to set up a dedicated space where you can recreate the exact same shot every single time.
- Lighting: Always use the same lights from the same positions. It doesn't matter if it's natural light from a north-facing window or a couple of softboxes; just keep it identical for every shoot.
- Angles: A tripod is your best friend here. Seriously, don't skip it. It locks in your camera's height and angle, guaranteeing a uniform look across your entire product line.
- Background: Stick to a simple, seamless backdrop. A white sweep is classic for a reason, but a consistent textured surface can work too. If you're aiming for that clean e-commerce look, this detailed guide to achieving a clean white background will save you a ton of editing headaches.
This infographic breaks down a simple, effective setup that you can easily replicate.
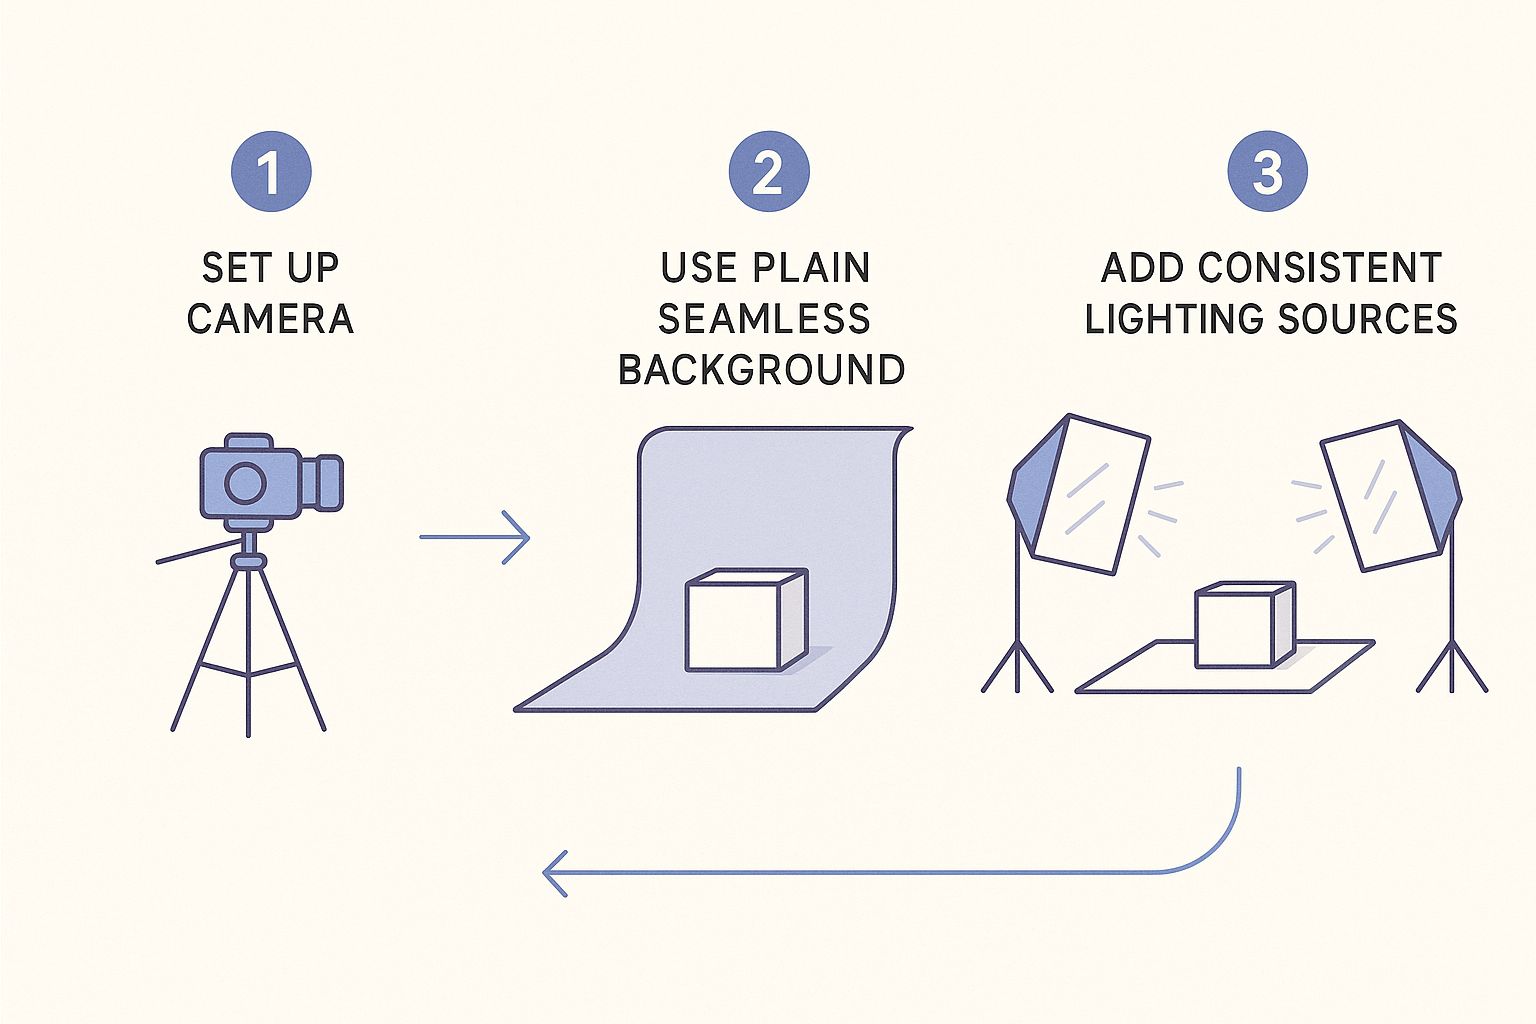
It all comes down to control. When you standardize your camera position, lighting, and background, you get predictable results that are a breeze to edit in batches.
Shoot in RAW for Maximum Flexibility
Here's a simple way to think about it: a JPEG is like a fully cooked meal. What you get is what you get. A RAW file, however, is like having a pantry full of all the raw ingredients. It's the pure, uncompressed image data straight from your camera’s sensor, which gives you so much more power in the editing room.
Shooting in RAW preserves an incredible amount of detail in the brightest highlights and darkest shadows. This gives you the wiggle room to fix exposure issues, nail the white balance, and pull back details that would be completely gone in a compressed JPEG.
Yes, RAW files take up more space on your memory card, but the editing flexibility is a trade-off that's absolutely worth it.
If you want a deeper dive into the whole process, we've covered everything from start to finish in our complete guide on how to take professional product photos. Getting this prep work right sets you up for a smoother, faster workflow that helps you turn good shots into fantastic e-commerce images.
Your Core Product Photo Editing Workflow
Once you've captured a clean, well-lit shot, the real magic happens in your editing software. This isn't about slapping on trendy filters or faking reality; it’s about polishing what's already there to show off your product's true quality. Having a consistent editing process is probably the most important thing you can do to create a professional and cohesive online store.
Think of it this way: you’re not inventing a new dish, you're just seasoning and plating a high-quality meal to perfection. The entire goal is to make the product the undeniable hero of the shot.

First Pass: Crop and Straighten
Before you even think about touching color or exposure, get the composition right. This first, simple step sets the foundation for everything that follows. A crooked or poorly framed product just feels amateur, no matter how perfect the lighting was.
First, straighten the image. I always use the gridlines in my editing tool to align the product with the vertical and horizontal axes. You’d be surprised what a difference even a one-degree tilt makes. Then, crop the photo to eliminate distracting empty space, forcing the viewer's eye directly to your product. Most e-commerce platforms do best with a 4:3 or 1:1 (square) aspect ratio, so cropping consistently is vital for that clean, uniform look on your category pages.
Mastering Exposure and White Balance
This is where you make sure your product looks both accurate and appealing. Exposure and white balance are a team—they work together to create a clean, true-to-life image that builds trust with your customers.
- Exposure: This is all about the overall brightness. The goal isn't to make the image blindingly bright, but to ensure the whites are pure and the product details are crystal clear. Watch out for "clipping" the highlights, which is when the brightest parts of your photo lose all detail and just become a flat white blob.
- White Balance: This is absolutely critical for color accuracy. If your white background has a slight yellow or blue tint, you can bet your product's colors are off, too. Use the temperature and tint sliders, or grab the eyedropper tool and click on a neutral white or gray area to instantly neutralize any color cast.
I can't stress this enough: getting the white balance right is one of the most important steps. It's what ensures a "sky blue" t-shirt actually looks sky blue on your customer's screen. Get this right, and you'll dramatically cut down on returns from people saying, "it wasn't the color I expected."
Add Depth with Contrast and Shadows
With the brightness and color dialed in, it's time to add some dimension. A photo straight out of the camera can often look a bit flat. A few small tweaks to contrast and shadows can make your product feel much more tangible and three-dimensional.
A slight bump in contrast can make the colors feel richer and give the edges more definition. Next, take a look at the shadows. Instead of trying to eliminate them, I like to gently lighten them just enough to reveal details that might be lost in the darker spots. This adds that crucial sense of depth without making the photo look unnatural.
To bring this all together, here's a quick look at the core steps you'll be repeating for nearly every product shot.
Key Steps in an E-commerce Editing Workflow
| Editing Step | Primary Goal | Common Tools/Adjustments |
|---|---|---|
| Crop & Straighten | Establish a strong, clean composition. | Crop tool, rotate/straighten tool, grid overlays. |
| Exposure Adjustment | Ensure the image is bright and details are visible. | Brightness/Exposure sliders, Histogram analysis. |
| White Balance Correction | Achieve true-to-life color accuracy. | Temperature/Tint sliders, Eyedropper tool. |
| Contrast & Shadow Tweaks | Add dimension and make the product "pop". | Contrast, Highlights, Shadows, Blacks sliders. |
Following this simple sequence of adjustments consistently is the real foundation of professional product photo editing. It’s how you turn a good snapshot into a compelling image that actually drives sales.
Advanced Techniques for a Polished Look
With the basic adjustments dialed in, we can move on to the finer details—the kind of professional polish that really makes a product photo stand out. This is where we take a good shot and turn it into a great one, building the kind of trust that encourages a customer to click "add to cart."
It’s not about making the product look fake or overly perfect. The real goal is to eliminate distractions and add a touch of realism that helps a potential buyer imagine the item in their own hands.
Removing Backgrounds for a Consistent Look
For e-commerce, a clean and consistent background is simply non-negotiable. Major marketplaces like Amazon demand it, and it gives your own website's catalog a sharp, uniform look. Taking out the original background puts your product center stage, with nothing to divert the customer's attention.
You could spend hours manually tracing products with the pen tool in Photoshop, and while that gives you precise control, it's a massive time sink. Modern AI-powered tools have completely changed the game here, delivering clean cutouts in just a few seconds. No matter which route you take, the objective is the same: clean edges that don't look artificially sharp or weirdly blurry.
Subtle Retouching for a Flawless Presentation
Even with careful handling, every product has tiny flaws that seem to pop out under bright studio lights. This is where subtle retouching comes in, letting you clean up those minor distractions without changing what the product actually looks like.
We're talking about small fixes, like:
- A stray piece of dust on a dark surface.
- A tiny scuff on a metal buckle.
- A faint fingerprint on a glossy finish.
Tools like the spot healing brush or clone stamp are your best friends for this work. The key is to keep your edits small and targeted. You're aiming to show the product at its absolute best, not create some plastic-looking, unrealistic version of it.
One of the biggest mistakes I see is over-editing. Customers are sharp—they can tell when an image feels too perfect or doctored. Your goal is to clean up, not to deceive.
Color Correction vs. Color Grading
People often use these terms interchangeably, but they serve two distinct purposes when editing product photos. Getting the difference is critical for both product accuracy and brand consistency.
Color correction is purely about accuracy. Its sole job is to make sure the colors in the photo are a true match to the real-life product. This is where you nail the white balance to ensure a red sweater looks actually red, a crucial step for keeping customer returns down.
Color grading, on the other hand, is all about style. It’s a creative process where you might infuse a subtle warm or cool tone across your images to match your brand's vibe. For instance, a brand with a rustic, earthy feel might apply a slightly warm, desaturated look to all its photography.
Adding Realistic Shadows for Depth
When you remove the background, you usually remove the natural shadow along with it. This can make your product look like it's just floating awkwardly in white space. Adding a realistic drop shadow is a tiny detail that makes a huge difference, grounding the product and giving it a sense of weight and place.
A soft, diffused shadow just underneath the item makes it feel tangible and real. In fact, this is a key trend in photo retouching right now, where authenticity is everything; customers simply respond better to images that feel genuine. For high-end items like watches or jewelry, keeping some of the original shadows and reflections can actually enhance their premium feel and depth. You can learn more about these evolving product photo retouching trends on picsretouch.com.
Using AI Tools to Accelerate Your Workflow
Manually editing photos, especially when you have a big catalog, can be a serious bottleneck. It's repetitive, it's slow, and it's holding your business back. But things are changing fast, and this is where AI-powered tools come in. They automate the most draining and complex tasks, helping you get professional results in a fraction of the time.
This isn't about replacing your creative eye. It's about enhancing it. Think of AI as your new, hyper-efficient assistant who handles all the tedious work, freeing you up to focus on the bigger picture. Instead of spending an hour tracing an outline, you can now remove a background with a single click.
Automating Repetitive Editing Tasks
The real magic of AI in photo editing is how it handles repetitive work with mind-blowing speed and consistency. For anyone selling online, this means you can process an entire photoshoot in the time it used to take to edit just a handful of images.
These tools are brilliant at a few key tasks:
- One-Click Background Removal: AI algorithms can instantly identify the subject in your photo with incredible precision, giving you clean cutouts perfect for any marketplace.
- Automatic Color Balancing: Keeping colors consistent across hundreds of photos is a classic headache. AI can analyze an entire batch of images and automatically correct the white balance and exposure for a perfectly uniform look.
- Intelligent Blemish Removal: AI can spot and remove minor imperfections—think dust, scratches, or smudges—without making the product look fake or over-edited.
This move towards AI-driven editing is completely changing how brands handle their visual content. It's not just about saving time anymore; it's about achieving a level of consistency across thousands of products that used to be possible only for huge companies with massive photo teams.
The last few years have seen a huge shift in product photo editing, mostly thanks to these AI tools. They don't just cut down on editing time; they guarantee consistent quality across huge numbers of images, making professional results accessible to everyone. With the global photography services market projected to grow from $55.6 billion** in 2023 to **$81.83 billion by 2032, the demand for AI-driven retouching is only going to increase. You can read more about the growth of AI photo services on digi-texx.com.
Beyond Editing to Image Creation
But AI’s impact doesn't stop with refining photos you've already taken. It's also unlocking entirely new ways to create product visuals from the ground up.
Let's say you need a lifestyle shot of your product in a specific setting, but a full-scale photoshoot is way out of budget. AI can solve that. Using the right tools, you can place your product into a generated scene, creating a compelling marketing image without ever picking up a camera. To see this in action, check out our guide on using an AI product photography generator. This gives you incredible creative freedom, letting you test different backgrounds and concepts to find what truly connects with your customers.
Getting Your Edited Photos Ready for the Web
You’ve done the hard work of editing your product photos to perfection. But that’s only half the job. If that stunning shot takes forever to load or looks pixelated on your site, all your effort is wasted. The last, and arguably most important, step is optimizing those images so they look great and load fast online.
This isn't just about technical tidiness; it’s about money. A sluggish website kills sales. Studies consistently show that even a one-second delay in page load time can slash conversions by a staggering 7%. And what’s one of the biggest reasons for a slow e-commerce site? Bloated, unoptimized images.
Pick the Right File Format
The file format you save your image in makes a massive difference to its quality and size. There’s no single "best" choice—it’s all about using the right format for the right situation.
- JPEG (or JPG): This is the workhorse for most product photography. JPEGs are brilliant at compressing images, giving you a small file size with almost no visible loss in quality. If you have a standard product shot on a solid background, this is your go-to.
- PNG: Reach for PNG when you need a transparent background. Did you cut out your product to place it on a colored section of your website? PNG is the format for that. The only downside is that PNG files are typically much larger than JPEGs.
- WebP: This is a more modern format from Google that’s a real game-changer. It offers even better compression than JPEG and also supports transparency like a PNG. Most e-commerce platforms and browsers support WebP now, so it’s a fantastic option for hitting that sweet spot between quality and speed.
Resize and Compress for a Faster Site
Once you've picked a format, it’s time to resize and compress. Whatever you do, never upload a full-resolution photo straight from your camera. Those files are gigantic and will bring your site to a screeching halt.
First, resize the image to the exact dimensions needed for your product listings. Check your e-commerce platform's guidelines for this.
Next up is compression. This process cleverly strips out unnecessary data from the image file to shrink its size.
Your goal is to find the perfect balance: the smallest possible file size with zero noticeable drop in quality. It sounds tricky, but today’s tools make it a breeze. As a rule of thumb, I always aim to get my product images under 100 KB.
Using a good image compressor tool can handle this for you automatically. It ensures your photos are lean and fast without sacrificing the crisp details you worked so hard on.
Don't Forget Your Image SEO
Finally, give your images a fighting chance to get discovered on Google. Image SEO is a simple but surprisingly effective way to pull more traffic to your product pages.
Start with a smart file name. Ditch IMG_8432.jpg and go for something descriptive, like handmade-leather-tote-bag-brown.jpg. It tells search engines exactly what the image is.
Then, for every single image, write good alt text. Alt text not only helps search engines understand your image content but it's also critical for accessibility, helping visually impaired users. A great example would be: "Handmade brown leather tote bag with brass hardware hanging on a white wall." These little details help your products pop up in image searches, opening up a whole new way for customers to find you.
What's Next for Product Visualization?
Let's be honest, perfectly polished static images are the bread and butter of e-commerce. They're non-negotiable. But if that's where your strategy ends, you're already falling behind. The future of product visualization is way more dynamic and interactive. To really stand out, you have to think beyond the flat, two-dimensional photo.
The whole game is changing. We're now focused on closing the gap between the convenience of online shopping and the confidence you get from holding a product in your hands in a real store. This is where technologies like 360-degree views and 3D models come into play. They let customers digitally pick up an item, spin it around, and inspect every last detail, building a level of trust that a simple photo gallery just can't compete with.
The Move Toward Interactive and Immersive Shopping
Think about it. If you're selling something complex like furniture or a piece of high-tech gear, this is huge. A customer thinking about a new sofa wants to see the texture of the fabric from every angle. A sneakerhead needs to zoom in on the stitching. Giving them that ability crushes the uncertainty that kills so many online sales.
One of the biggest shifts we're seeing is the explosion of 3D imaging. This isn't just a gimmick; it's on its way to becoming the new standard for serious online retailers. It gives shoppers a truly immersive way to see products from any angle they can imagine. This kind of interaction grabs their attention, answers their questions before they even ask them, and makes them confident enough to click "buy."
When you let shoppers play with a product in a virtual space, you're not just showing them an item anymore—you're giving them an experience. That "hands-on" feeling is what turns a passive browser into an active, engaged buyer.
And this goes beyond just taking more pictures. You can now explore how 3D product rendering for business lets you create stunningly realistic images from digital models alone. Adopting these formats isn't just a cool, futuristic idea anymore. It’s quickly becoming a critical differentiator for e-commerce brands that plan on sticking around.
Answering Common Photo Editing Questions
Even with a great process, you're bound to run into a few questions along the way. Let's tackle some of the most common hurdles e-commerce sellers face when they start editing their product photos.
What’s the Best Software for Editing Product Photos?
This is the classic question, and the honest answer is: it depends on what you need most.
For those who want total creative freedom and don't mind a learning curve, the industry heavyweights are Adobe Lightroom and Photoshop. You can't beat them for deep, manual adjustments, whether you're doing complex retouching or finessing color grades.
On the other hand, if your priority is speed and consistency across hundreds of images, AI-powered tools are a game-changer. They're brilliant at automating the repetitive stuff, like removing backgrounds or applying the same color correction to a whole batch of photos.
My favorite workflow is actually a hybrid. I'll use an AI tool to do the bulk work—like knocking out the backgrounds on 50 new product shots—and then pop into Photoshop for any final, detailed tweaks that need a human eye.
How Can I Make My Product Colors Look Accurate?
Getting color right is non-negotiable. It’s one of the biggest factors in preventing customer returns. This battle is actually won during the photoshoot itself, where setting a custom white balance on your camera is your first line of defense.
In the editing phase, your best friend is the white balance or color calibration tool in your software. The simplest trick in the book is to use the eyedropper tool. Just find an area in your photo that's supposed to be a neutral gray or a pure white and click on it. The software will instantly adjust the entire image, killing any weird color cast and making your product's colors pop accurately.
Should I Really Remove the Background from All My Product Photos?
Not always! It completely depends on where and how you’re using the photo.
- For your main product shots? Yes, 100%. A clean, white, or neutral background is the standard. It’s even a requirement for major marketplaces like Amazon. This look is professional, puts the focus entirely on the product, and avoids any distractions.
- For lifestyle photos? Absolutely not. The background is the whole point! These in-context images tell a story. They show your product in action and help customers imagine it in their own space, which is a powerful sales tool.
A solid strategy is to offer both for every product. Lead with the clean, main shot, but supplement it with compelling lifestyle images to give customers the full picture.
Ready to skip the manual work and get stunning, consistent product photos without the hassle? QuickPixel uses AI to transform your images into high-quality, sales-ready assets. Discover how QuickPixel can elevate your e-commerce store today.
Try QuickPixel Today
Get started with our AI-powered image generation tools