How to Compress Images for Faster Websites
Let's be honest, figuring out how to compress images comes down to a simple, crucial formula: shrink the file size to make your website faster—without making your visuals look terrible. Getting this right is one of the single most powerful things you can do to boost your site’s performance, climb the SEO rankings, and keep people from bouncing.
Why Image Compression Is Non-Negotiable
Before we jump into the "how," let's talk about the "why." Why is this so important? Because large, unoptimized images are almost always the number one culprit behind slow-loading web pages. In an era of shrinking attention spans, a delay of just a second or two can mean the difference between a sale and a lost customer.
Think about it from your visitors' perspective. They land on your site expecting a smooth, fast experience. If they have to sit there waiting for giant images to load, they get frustrated and click away. That "bounce" tells search engines like Google that your page isn't delivering, which can hurt your rankings over time.
The Business Case for Smaller Images
The fallout from slow pages isn't just theoretical; it hits your bottom line directly. Understanding how image optimization plugs into your overall search engine optimization (SEO) strategy is a game-changer for any online business. It's a core component of good ecommerce SEO best practices that can give you a real edge over the competition.
This simple decision tree really drives the point home, showing how page speed connects directly to what matters most.
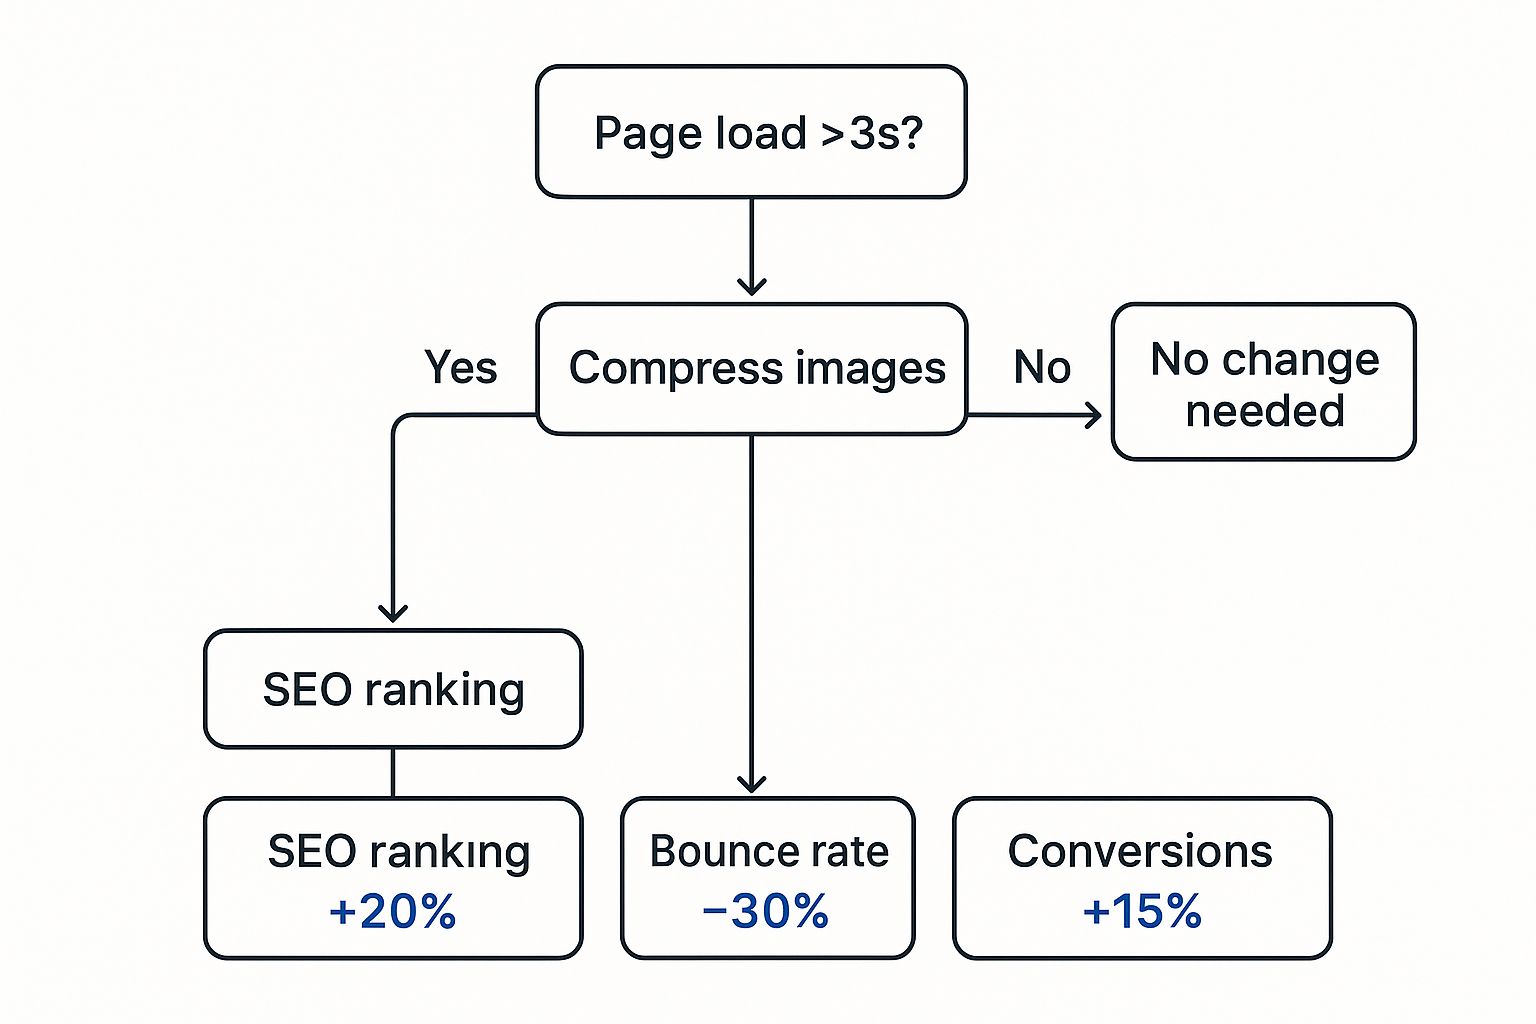
As you can see, once your load time creeps over three seconds, you start seeing some serious damage. A faster site, on the other hand, gets rewarded with better rankings, higher engagement, and more sales. It's a clear win-win.
It's also pretty cool to think about the history here. The technology we use today, like the JPEG format, didn't just appear overnight. It was built on decades of innovation, like the discrete cosine transform (DCT) developed way back in the early 1970s. This foundational work led to the JPEG standard we know and love, which was officially established in 1992 and basically paved the way for the entire digital photography revolution.
By optimizing your images, you're not just making files smaller; you're directly improving user experience, strengthening your SEO, and protecting your bottom line.
Lossy vs. Lossless: Picking the Right Compression Method
When it comes to compressing images, your first big decision is which path to take. It's not just about shrinking a file; it's about choosing how it shrinks. You have two main options: lossy and lossless compression. Nailing this choice is the key to striking that perfect balance between a fast-loading website and crisp, beautiful visuals.
To really get this right, it helps to understand the fundamental difference between lossy and lossless compression. Once you get the core concept, you'll know exactly which tool to reach for in any situation, keeping your site both fast and visually stunning.
When to Go with Lossy Compression
Lossy compression is all about smart sacrifices. It works by permanently getting rid of some of the original image data. That sounds a little scary, I know, but the data it removes is usually stuff our eyes wouldn't notice anyway.
The result? Dramatic file size reductions, often slashing an image’s weight by 70% or more. This makes lossy compression the workhorse for most photos you see on the web.
Here’s where it really shines:
- Complex Photographs: From homepage hero images to e-commerce product shots and blog post pictures, the subtle details and color gradients can be compressed heavily before you'd ever spot a difference.
- Background Images: Large, atmospheric background visuals are prime candidates for lossy compression. Their job is to set a mood, not provide razor-sharp detail.
Imagine a beautiful 2 MB photo you want to use for your website's main banner. That's a performance killer. A healthy dose of lossy compression can bring it down to around 300 KB, and I guarantee your visitors won't see the difference—but they'll definitely notice the faster load time.
Key Takeaway: Use lossy when maximum file size reduction is your goal, and a tiny, often imperceptible, drop in quality is a price worth paying for speed.
When You Absolutely Need Lossless Compression
Lossless compression takes a completely different approach. It reorganizes the image data more efficiently without deleting a single bit of information. It's like zipping a folder on your computer—everything is packed down neatly, but all the original data is still there, ready to be perfectly reassembled.
This meticulous preservation is non-negotiable for graphics where every pixel has a purpose.
You'll want to stick with lossless for:
- Logos and Icons: Every line and curve in a logo or UI icon needs to be perfectly crisp. Lossless compression ensures there are no blurry edges or weird artifacts.
- Technical Diagrams: When you're showing charts, blueprints, or screenshots with text, clarity is everything. Lossless keeps text sharp and readable.
- Images with Transparency: For PNG files with transparent backgrounds, lossless is the only way to maintain clean, sharp edges around your subject.
The trade-off here is that the file size savings are much smaller, usually somewhere in the 10-30% range. But for those images where detail and precision are paramount, preserving that perfect quality is always the right move.
Lossy vs Lossless: A Quick Guide
Still weighing your options? This table breaks down the key differences to help you decide which compression method is the best fit for your specific needs.
| Attribute | Lossy Compression | Lossless Compression |
|---|---|---|
| File Size Reduction | Significant (often 70%+) | Modest (typically 10-30%) |
| Quality | Some data is lost; minor quality reduction | Perfect pixel-for-pixel quality is preserved |
| Best For | Photos, complex images, backgrounds | Logos, icons, text, transparent PNGs |
| Common Formats | JPEG, WebP (lossy mode) | PNG, GIF, WebP (lossless mode) |
Ultimately, the choice comes down to the image's role on your site. If it’s a detailed photo, lossy is your friend. If it’s a graphic that needs to be razor-sharp, lossless is the way to go.
The Best Image Compression Tools for Any Workflow
Knowing the "how" of image compression is one thing, but having the right tool for the job makes all the difference. Thankfully, we're spoiled for choice. There are simple browser-based apps for a quick fix, powerful desktop programs for the pros, and even automated plugins that do all the heavy lifting for you. It's all about finding what fits your day-to-day work.
For most of us, a good online tool is the perfect place to start. These are incredibly convenient—you just drag and drop your image, let the algorithms work their magic, and get an optimized file back in seconds. No fuss, no installation.
Quick and Easy Online Compressors
When you just need to get it done fast, you really can't beat an online tool. They're my go-to for compressing a handful of images when I don't want to get bogged down in a bunch of settings.
A great example is a free tool like QuickPixel’s online image compressor. It strikes that perfect balance between being simple to use and delivering impressive results. These tools are perfect for:
- Bloggers and Content Creators who need to prep images quickly before hitting "publish."
- Small Business Owners updating their e-commerce site or website photos.
- Literally Anyone who needs a fast, one-off compression without installing any software.
Advanced Desktop Software for Full Control
Now, for photographers, designers, or anyone who needs total, granular control over the final image, desktop software is the only way to go. Programs like Adobe Photoshop or the open-source alternative GIMP are the industry standard for a reason. They let you meticulously fine-tune that delicate balance between quality and file size, usually with a handy live preview.
I live by this level of control in my own work. Being able to drag a JPEG quality slider from 0 to 100, export to different formats, and strip out unnecessary metadata gives you complete command. For any professional project, that visual integrity is non-negotiable.
Automated Plugins for Hands-Off Optimization
If you run a website on a platform like WordPress, this is where you can really save some time. Image optimization plugins are an absolute game-changer. Tools like ShortPixel or Imagify can automatically compress every single image you upload. They can even go back and optimize your entire existing media library.
This is the ultimate "set it and forget it" solution. Once it's running, you can be confident that every image on your site is helping, not hurting, your page speed. Integrating a plugin directly into your workflow is easily the most efficient way to manage image compression at scale.
JPEG, PNG, and WebP: Picking the Right Tool for the Job
Before you even think about compression levels, the first decision you have to make is picking the right image format. Get this wrong, and you're fighting an uphill battle. Choosing the best format from the get-go is half the work, setting the stage for a lean, fast-loading image.
Think of it this way: you wouldn't use a hammer to drive a screw. The same logic applies here. Let's look at the big three formats and when to use each one.
JPEG: Your Go-To for Photos
For decades, JPEG (or JPG) has been the undisputed king of web photography. It's built to handle the millions of colors and subtle gradients found in real-world images, like product shots, portraits, and landscapes.
JPEGs use lossy compression, which cleverly discards tiny bits of data your eyes likely won't notice. This is what allows for a massive reduction in file size without sacrificing much visual quality. Mastering this balance is a core skill in photo editing for e-commerce, where every kilobyte counts towards a faster user experience.
PNG: For Graphics That Need to Be Crisp
When your image needs sharp lines and a transparent background, PNG is the only way to go. It uses lossless compression, which means not a single pixel of detail is lost. It’s a perfect copy of the original.
This makes it the ideal choice for:
- Logos: Keeps your brand identity sharp and professional.
- Icons: No fuzzy edges or weird artifacts.
- Graphics with text: Ensures every letter is perfectly crisp and readable.
The killer feature for PNG is its alpha channel support. This is what allows for true transparency, letting you place your logo or an icon on any background without that ugly white box around it.
WebP: The Modern All-Rounder
Developed by Google, WebP is the new kid on the block that has quickly proven its worth. It’s a fantastic hybrid format that supports both lossy and lossless compression, often resulting in files that are 25-34% smaller than their JPEG or PNG counterparts.
WebP can do it all—from rich, detailed photos to sharp graphics with transparency—but at a significantly smaller file size. Browser support used to be its Achilles' heel, but those days are long gone. It’s now fully supported by all major browsers, making it a reliable and incredibly efficient choice for any modern website.
Advanced Optimization Beyond Simple Compression
Knowing how to compress an image is a great start, but it's only half the battle. To really nail your site's performance, you need to think bigger than just compression. Just running a photo through a tool without considering its role on the page can still leave you with a sluggish website.
One of the most common mistakes I see is uploading an image that's way too big for its container. For instance, uploading a massive 4000-pixel wide photo just to display it in an 800-pixel slot is a huge performance killer. The browser is forced to download all that extra data and then work to shrink the image down, wasting bandwidth and time.
Think Beyond the File Size
The golden rule here is to resize your images to their final display dimensions before you even think about compressing them. This single step makes a massive difference, reducing the initial file weight and giving your compression tool a much more manageable file to work with.
You can figure out the right dimensions using your browser's developer tools, or just use a purpose-built tool to handle it. We actually have a straightforward image resizer that can streamline this whole process for you.
Another powerful technique you should have in your toolkit is lazy loading. This clever method tells the browser not to load any images until they're actually visible on the user's screen.
Lazy loading is a game-changer for long pages or image-heavy galleries. Instead of loading everything at once, it defers off-screen images until the user scrolls down to them, dramatically speeding up initial page load time.
This idea of optimizing data isn't new; it has roots in some pretty critical applications, like space exploration. Back in the 1960s, NASA's Voyager missions relied on compression to send images from deep space back to Earth over incredibly limited bandwidth. You can read more about these early data compression methods from pioneers in the field.
By adopting these kinds of advanced strategies, you ensure every single image on your site is pulling its weight and contributing to a fantastic user experience.
Common Questions We Hear About Image Optimization
Even with the best guides, a few questions always seem to pop up when it comes to shrinking down image files. Let's walk through some of the most common ones I hear from clients and colleagues to get you optimizing with total confidence.
Will Compression Turn My Images into a Blurry Mess?
That's a common fear, but the short answer is no—not if you do it right. The key is understanding the two types of compression.
Lossless compression is your friend when quality is non-negotiable. It reorganizes the image data without discarding any of it, so you get a smaller file with zero quality loss. Think of it as a perfect digital copy.
With lossy compression, you are sacrificing a tiny bit of data for a much bigger payoff in file size. But here’s the good part: you are in complete control. For most photos on the web, you can apply a moderate level of compression and slash the file size without anyone ever noticing a difference. Modern tools give you a live preview, so you can dial it in to find that perfect balance.
So, What's the Best Image Format for My Website?
This is a great question, and the answer really boils down to what the image is doing. There’s no single "best" format, but there are clear winners for specific jobs.
- JPEG: This is still the king for photographs. If you have a complex image with lots of colors and gradients, JPEG is your go-to.
- PNG: Need a transparent background for a logo, icon, or diagram? PNG is designed for exactly that.
- WebP: This modern format is often the best of both worlds. It usually offers better compression than both JPEGs and PNGs, but you'll want to double-check that your web platform or content management system fully supports it before going all-in.
How Can I Optimize Images I've Already Uploaded?
It's never too late! This is actually one of the fastest ways to give an existing website a performance boost. If you're using a platform like WordPress, you can find plugins that will scan your entire media library and compress everything for you automatically.
If you aren't on a platform with plugins, the process is a bit more hands-on but totally manageable. You'll need to download the images from your site, run them through an optimizer, and then re-upload them to replace the old, larger files.
A Quick Word of Caution: Before you start a bulk compression job on your live site, please back up your original images. It’s a simple step that can save you from a world of regret if something goes wrong.
Is Resizing My Images Before Compressing Really Necessary?
Yes. Absolutely, 100% yes. If you take only one thing away from this guide, let it be this: resize your images before you do anything else.
Think about it this way: if your website displays a product photo in an 800-pixel-wide box, uploading a massive 4000-pixel photo is pure waste. The browser still has to download that giant file, only to shrink it down. Compression helps, but it can't fix a fundamentally oversized image.
Resize first, then compress. That's the mantra.
Ready to turn your product photos into professional, high-converting assets? QuickPixel uses AI to transform simple snapshots into studio-quality images in under 48 hours. See the difference for yourself at https://quickpixel.co.
Try QuickPixel Today
Get started with our AI-powered image generation tools